I come across all of these fun things to do and then promptly forget them. This is mostly for my use (like the cookbook blog) to organize things - places we've been and places that sound fun. Maybe I'll give this it's own blog later on but for now it's a post that I can refer to when needed.
Lair O' The Bair Park - shady walking trails, streamside. Picnic spots with BBQs abound. Easy for kids. Wading spots! FREE
Littleton Historic Museum - historic park in downtown Littleton. Farm buildings, schoolhouse, animals, blacksmith shop, homes and farm/garden/orchard. Indoor museum with exhibits on site. Kids section of museum is great for toddlers and preschoolers. FREE
Chatfield Gardens - working farm, historic buildings, lots of trails. ADMISSION (but look for free days from SCFD)
Other things with Free Days from SCFD - Denver Zoo, Denver Museum of Nature and Science, Denver Botanic Gardens, Denver Art Museum, Denver Center for Performing Arts
Summer Reading Program from Jefferson County Library - AWESOME and FREE! From Jun 1 to the end of July read 8 hours (for kids) and get a free book and coupons for activities. Each year you get a coupon when you sign up and another when you finish for Lakeside Amusement Park. One is for free parking and the other is for unlimited rides so use them together for a completely free day! The park is a little run down but they have nice rides for the kids and our family looks forward to our day here each year!
Jefferson County Library Culture Pass - free passes to local museums for library card holders. Passes for the Butterfly Pavilion, Byers-Evans House Museum; Denver Firefighters Museum; Denver Museum of Miniatures, Dolls & Toys; Dinosaur Ridge, MCA Denver, Rocky Mountain Quilt Museum. They also used to have the Wildlife Experience but I'm not seeing it currently.

Monday, July 19, 2010
How About Quarterly?
Not so good at the updates am I! Hmmm. I'm not sure what to do to catch you up - maybe I shouldn't try. Here are the biggies - Megan is now ONE! She is tiny, but maybe that's Rick's fault for naming her after her 5ft 6in great aunt instead of her 6ft and 3/4in mommy. She is just barely 17 pounds (2%) now and just in the 65% for her height. But since the other kids were all in the 30s for weight and 90s for height maybe I could just subtract the weight% from the height% and say she fits right in, just smaller! She's standing and cruising and jabbering and I am completely in love with her. She loves me best - unlike the others - and I enjoy that!
We are now HOMESCHOOLERS! I am thrilled. Almost 8 years ago I gave up classroom teaching to nurture my growing family and I am really looking forward to combing my passions more formally and not losing those precious hours with my children each day. I know we will tinker a lot over the coming year but I have a plan and my kids are good sports so we will get through it. I am excited to be able to provide my kids with the respect and education they deserve. 'Nuf said. : )
And because I love to see what other families are doing I'll tell you what I know so far and update as I solidify our schooling choices. I'm starting with Saxon Math all around (A in 3rd, N in 1st), The Story of the World for History, and then we'll do some reading/spelling and whatever we feel like researching for Science. The oldest 2 will be doing a Homeschooling Co-Op on Fridays where N will do Kindergarten and A will be taking things like History, Science Labs, Writing and fun things like that. It's not a full course, just fun enrichment activities. We'll also do a smattering of Spanish, Art Appreciation and I'm toying with beginning Latin. Don't you wish you could go to school here? And we'll absolutely mummify chickens when we study Egypt. We are that cool.
We just finished up swimming lessons. My kids will not release the instructor from the death grip and therefore don't actually "swim". Now that our days will free up and the babies are growing up I feel like we can make family swim a more prominent feature of our lives and work on this. Of course, I really have no room to talk here about having Chicken Children. I am the girl who couldn't be PAID to do a somersault in Junior High PE because I was too scared to be upside down and look dumb in front of my peers. Yes, my PE teacher's assistant Rhamu McCoy offered me $5 to do it and I refused. I spent our gymnastics unit in PE in a separate room from the class, sitting on a mat refusing to roll. I know, that is crazy. And sad. Yet it is true. So I'm not too hard on them!
We have two sibling weddings and a Washington trip coming up - pictures of our adventures to come! I'm thinking our Australia trip will be postponed until 2011 when we can save up vacation since Rick will be starting his new job next month (!) and won't have built up any vacation. Hope my Oma can stay healthy another year and see her great-grandbabies!
I started exercising a little. I would love to do more.
We have a patio now!
We have wood floors!
My front yard looks nice!
Rick and I just celebrated our 12th anniversary and I gave him the COOLEST present. (An awesome photobook!)
I got a haircut for the first time in over a year - wowsers this has been a ridiculously trying year of mommyhood for me!
Still to do:
finish basement
homeschooling area
backyard
go on dates - I'll take anything!
move to the beach
Saturday, March 20, 2010
Weekend of Crafts on the Cheap
First - just take yourself over here. Kristine McKay Designs is such a fantastic place to get fun ideas for crafts and decor. I have to say it's one of my favorites. Here are some of the reasons I love her: (dearly not queerly as Kim would say!)
 Aren't these hideous? Why would you put yellow stripes down the sides? Silly people.
1. She has great taste. I find many sites where I like something they've shared but the majority of the crafts are just not my style. Not so with Kristine! I love it all!
2. She shares. She has created these lovely things and then she explains them! And shares files so you can copy her exactly! It is so irksome to see a "craft blog" with just pics and no explanations of how they did it. I'm not a creative gal, just a copycat so I appreciate directions! And really, her downloads so you can have the same graphics she used are such a bonus!
3. She does things that are easy and reasonable in cost. This is very important to me as I just can't spend lots of money without getting hives - or the heebies at least. :)
I have to say there is a bad side to all this craftiness... I now want a Silhouette cutter. Badly. I need vinyl.
So here is a wreath for next year based on Kristine's Easter wreath made with supplies from the Dollar Tree. Check out her post at the site linked above. My wreath definitely needs a little something to perk it up. I have no idea what that something may be. Ideas?


plus this...


The wreaths at JoAnne's (speckled eggs on Spanish moss) were $30 a piece. I kid you not. I cheated and didn't spray paint the Dollar Tree eggs like Kristine did, I just bought a package from JoAnne's (on a tip from Kristine) for $3. And comparing the 2 wreaths I'm thinking I may rearrange my eggs. But I did it while watching Twilight. I was distracted. ;)
And here we have my next attempt at crafting. I'm hoping that this...

plus this...

will equal this.
This is from this site. The plaque she bought (Happiness...) is from the Dollar Tree as well. She painted everything and then antiqued it. I have a plaque as well that I did this to - just has a different saying.
 Aren't these hideous? Why would you put yellow stripes down the sides? Silly people.
Baby updates
Here we have Megan at 8 months
 enjoying some apples in her new highchair. Be impressed - this is our fourth baby and FIRST highchair. I am that cheap, or maybe not... since I paid for a chair that will only be used by one kid.

And here is a not-so-flattering pic of Lauren. But I wanted to show you that now at 2 years old she has let me do something to her hair. This was on a Monday following a weekend where I had multiple people each day ask about my little boy/son. This prompted me to attempt to put what little hair she has in a girly style. This lasted for just minutes so our photo ops were not many. Such a cute little stinker! She's let me try it a couple of times since. Hopefully the style will grow on her and she'll leave it in soon!


And here she is in her saucer at 7 months. Still putting everything in her mouth. This time it's maracas from Holly. Mmmmm maracas.
Megan is fine... I think. Her eating leaves a LOT to be desired and consequently she's a skinny little thing. But happy! She still won't do a bottle or cup so I'm just praying (literally) that she'll be OK and continue to develop as she should and be a healthy little girl. I'm still pumping as much as I can after feedings to have milk to mix with her cereal and hopefully increase production so the few minutes she does nurse will hopefully be more beneficial.
Megan is fine... I think. Her eating leaves a LOT to be desired and consequently she's a skinny little thing. But happy! She still won't do a bottle or cup so I'm just praying (literally) that she'll be OK and continue to develop as she should and be a healthy little girl. I'm still pumping as much as I can after feedings to have milk to mix with her cereal and hopefully increase production so the few minutes she does nurse will hopefully be more beneficial.
And here is a not-so-flattering pic of Lauren. But I wanted to show you that now at 2 years old she has let me do something to her hair. This was on a Monday following a weekend where I had multiple people each day ask about my little boy/son. This prompted me to attempt to put what little hair she has in a girly style. This lasted for just minutes so our photo ops were not many. Such a cute little stinker! She's let me try it a couple of times since. Hopefully the style will grow on her and she'll leave it in soon!

In other Lauren news - she's been 2 now for 2 weeks. She knows all her colors and (check this out!) most of her alphabet (upper case and what sounds the letters make). Yeah, she's a genius. Which of course reflects directly on my parenting skills. ;) Or that's what I tell myself. She's so fun to be with and I'm glad I get to hang out with her all day - she keeps me going. Well, she also drives me nuts (such a strong-willed little lady), but I'll take the good with the challenging!
Thursday, March 18, 2010
Free Birthday Cards!
I used to be the one in our family who sent everyone a card on their birthday. Now that is not very impressive for most families but on my husbands side there are nine children - and 6 of them are married/with kids. With grandparents/greats, siblings, spouses, neices and nephews that was a LOT of cards! I used to be very organized and divide my card needs into adult male, adult female, juvenile male, juvenile female, and a special card for the first birthday. I handmade cards for each group and put the card in an envelope. I made sure that each family didn't receive exact duplicates in one year of any given card. I added not only birthdays to my calendar, but 4 mailing days prior to the birthday I added a "Mail it" reminder. It doesn't surprise you that I'm a Type A Virgo Math major does it? ;)
After I had my third child this all fell by the wayside. I started missing birthdays and instead of just shrugging it off and continuing with the next birthday I imagined the mess it would be if Susie opened a card and her brother Johnny remembered that 2 months prior he had received no card from me. I felt terrible! So I stopped doing them all together. BUT.... now I think I found a good solution!
And to save even more time I designed a coordinating back side that included a birthday message, our family's names and (on the top right corner that's been cut off in the pic) our return address. Sweet! All that's left is to address them to the individual and maybe add a quick personal note. Oh, and I suppose some postage. Hmmmm - I wonder if they make "Forever" stamps for postcards... somehow I doubt it! ;)
After I had my third child this all fell by the wayside. I started missing birthdays and instead of just shrugging it off and continuing with the next birthday I imagined the mess it would be if Susie opened a card and her brother Johnny remembered that 2 months prior he had received no card from me. I felt terrible! So I stopped doing them all together. BUT.... now I think I found a good solution!
I read a post on "How Does She?" and was inspired! Using VistaPrints famous freebies I designed a postcard for our families birthdays! With shipping I received 100 cards, personalized and ready-to-mail for less than $1 out of pocket. The total actually came to $6.xx but I had some PayPal money from surveys that I occasionally receive that I was able to use.
Here are the cards I designed...

And to save even more time I designed a coordinating back side that included a birthday message, our family's names and (on the top right corner that's been cut off in the pic) our return address. Sweet! All that's left is to address them to the individual and maybe add a quick personal note. Oh, and I suppose some postage. Hmmmm - I wonder if they make "Forever" stamps for postcards... somehow I doubt it! ;)

Friday, February 26, 2010
The Rosette Tee
And here it is! I'm finally posting pictures of the T-shirt refashion I talked about! I told you I was waiting for a good hair day to post these and while pig tails may not be a good hair day to you - it certainly is for me! :) (You have to take what you can get when you haven't had a haircut in 8 months).


This is such a great technique! I'm thinking it would be fun to do a shirt for Independence Day this year! And I know that rosettes will be a lovely tool in my little girl clothing refashioning arsenal.
So without further ado... the shirt!
(Which, in case you're interested is from Chimera Clothing - I saw they had a great sale a while back and I love EVERYTHING that I received!)

And here is a close up of the embellishment...

There are 10 rosettes total on my shirt. The original tutorial used V-necks/scoop necks and I think that a V-neck would be more flattering, but I needed to fix up this shirt (when you are tall and nothing fits you you can't let a couple of blue stains get in the way of a shirt that fits!) so I used this one. I chopped up a shirt my daughter had gotten sticky goo all over, as well as stained, and that is why my version has two different colors.
This is such a great technique! I'm thinking it would be fun to do a shirt for Independence Day this year! And I know that rosettes will be a lovely tool in my little girl clothing refashioning arsenal.
Saturday, February 20, 2010
Getting ready for spring!
I have toyed around with growing herbs indoors for so many years but have never actually done it. Well - this is the year!

The package comes with all four seeds mixed together so, of course, I separated them! If you know me, you know it would drive me bonkers to not know what each seedling was and to have them all growing together. It wasn't too bad!

Here's some help for you...
I saw something similar to these clay pots and loved the idea! You use chalkboard paint (did you know you can make your OWN???!!!) and a pot and you are set!
I found a kit at the Dollar Tree that comes with Basil, Dill, Chives, and Parsley seeds as well as a tray and lid to germinate the seeds. And though it doesn't come with soil, you can get that at the Dollar Tree as well!
The package comes with all four seeds mixed together so, of course, I separated them! If you know me, you know it would drive me bonkers to not know what each seedling was and to have them all growing together. It wasn't too bad!

Here's some help for you...
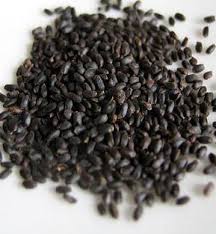
Below are the dill seeds. They have this flat little halo around them so they are easy to distinguish.


And below are the parsley seeds. They look similar to the dill, but are a little more of a crescent shape and don't have that halo.


Below is the Sweet Basil. It is smoother and less angular - like an oval. It's also less deep of a black color.


I plan to divide the herb box into quadrants and then move the seedling later to my pots. So exciting!
Friday, February 19, 2010
Pot Holders

I love these! Of course, I did make them, so there is the whole "I'm so cool" feeling that goes along with homemade items but I really love the design! It really is a nice way to grab those pans and until I saw this tutorial I hadn't ever noticed this style of mitt in stores.
Sewing through the multi-layer thickness of the project was a real pain though. I unpicked a LOT! But the result was worth it I think.
Sunday, February 14, 2010


Friday, February 12, 2010
Baby Gift - car seat cover

It is still chilly here and so I think this is such a handy little gadget for the new baby in your life! Here is our little one's car seat cover - perfect for our chilly Colorado winters! I made this over the Christmas holiday and we have loved it!
I used the tutorial here. I used fleece for one side and flannel for the other. This was a slippery thing to sew for some reason and even though I pinned it still came out all wonky. I did the best I could and trimmed the edges before flipping right-side out and top-stitching. I didn't do any of the "quilting" or random stitches to keep the fabric from slipping because I didn't feel it was necessary. And after a couple months of use I still think so! :) It can't hurt though - but you can always add it later if you need it.
One thing I would change would be the length of the ribbon. I used the longest length suggested and they are too short for my liking. At least 6" longer would be needed for me - but that could be my very non-superior bow-tying skills at work!
Wednesday, February 10, 2010


Sunday, February 07, 2010
The Fabulous Extension Service - aka How to Use Your Food Storage!
The resources at our fingertips are truly incredible! With the internet we can access information in seconds that can truly make our lives better! Some of my favorite websites are the state university extension sites. Local land-grant universities have extension offices that give information about gardening, canning, money and lots of topics on my very favorite thing - FOOD!
In my quest to do better for my family and improve my skills as a homemaker I have found some terrific resources from the extension offices.
Ready-Quick Mix - from USU (Utah)
Here's a printable recipe booklet that is similar to Bisquick - but homemade! Some of the recipes include Meat Pinwheels (There is also a variation for a creative tuna casserole with the same idea!), Magic Taco Pie, Cinnamon Spins, and lots of cookies, cakes and even brownies.
Mixing It Up - USU
20 pages of a DIY homemaker's delight! Mixes for everything!!! Includes the ready-quick mix with recipes for cornbread, raisin bread, muffins, coffee cake, waffles, cobbler, even pie crust. Has Magic Mix for soups, chowders, and casserole. Has SOS (cream soup) Mix and recipes for cream of whatever soup (I never use cans any more!), even potato soup in a cup! Recipes also included for seasoning mixes like taco, chili, pizza, mediterranean, ranch dressing, Rice-a-roni, hot chocolate and Instant Breakfast.
Dry Milk - USU
A handy booklet with a table to help you figure out how much of instant or regular dry milk you might need for a recipe. There are also tips on how to boost nutrition by adding dry milk to your meals straight - like in meatloaf. You will find a section on how to decode the labels on different milks and what you should know before you buy dry milk. It will also tell you how and how much milk you need to store for your family and how to use it! Pudding in a blender, fudgesicles, make your own Cool Whip, you name it!
More Dry Milk! - USU
A handout from a presentation based on the above booklet. Inside you'll find new and yummy recipes (as well as some that are already included in the USU handouts)!
SOS (Soups or Sauces) - USU
This is the recipe booklet that got me hooked on the Extension! It has a substitute for cream of chicken/mushroom/whatever that I substitute in all of my recipes. Healthier than canned and no fat! It also includes other recipes for sauces and dishes - we like the Chicken Pot Pie and Enchiladas.
Magic Mix - from Washington State University
This version is similar to the USU SOS mix - no fat! Use it for soups, pudding (even in the microwave!)
I love these publications because they show you how you can make your own convenience foods and make them more cheaply and healthier. I feel like it is important to not only have a long-term food storage but know how to use it every day so that
1. you know what to do with your food items
2. your family is used to eating them
3. you can provide your family with healthier meal where you control the ingredients/fat/salt by not relying on packaged foods
4. you rotate through your items, not just let them expire on a shelf - not a frugal way to cook!
5. you keep a tighter reign on your food budget by learning to make items you might normally buy packaged at the store.
Saturday, February 06, 2010
So Purdy!

Awww - can you feel the love? February is a Love Fest over here in Colorado! We spread the Valentine holiday out and treat each other to fun month of celebrating the love we have as a family. We have special dinners and leave each other notes and gifts all month long in the little mailboxes that sit on our mantel. I love February.
Last night I finished the last few items on my Valentine decorating list while watching the Swiss Family Robinson. And because I share it all - let me tell you something kinda funny. A ways into the movie I felt super smart and had to share my intellectual genius with my hubby! I had noticed the characters mentioning some cities back home - Bern and Interlaken to be exact and had a lightbulb moment! I said to my husband, "Hey Rick! I think the family is from Switzerland!" While waiting for him to compliment me on my knowledge of geography (I didn't even have to google it!) he grinned and paused a moment. Looking at his face and suddenly hearing my thought spoken out loud I realized what a true GENIUS I am. Gee - Erika, how did you figure that out? Could it be perhaps from the movie's TITLE???
Oh well, I am breathing a sigh of relief and I am really happy with how it all came out! These were very inexpensive and as usual the Dollar Tree figured prominently!
Here is the how to...

Framed XOXO - buy some frames at the Dollar Tree or use ones you already have. Mine are all 5x7 size. Paint if desired (I use the $1 black spray paint from Wal-Mart - 2 coats). Cut out a piece of decorative paper and slip in front of the glass. Play with the glass pebbles found in the floral department (again the Dollar Tree - I bought two packages, but used less than one for these four frames) until you find a design you like. Then glue them on - I used E6000. I just lifted up one pebble at a time and glued so I didn't disturb my design. I found the original idea at tatertotsandjello. I'm thinking her frames were bigger or her pebbles smaller - but either way they are lovely!
I'm anxiously waiting for her post on Monday about her Dollar Tree tiered serving platter! I've been wanting one and I'm thrilled to make one myself on the cheap and tailored to my taste!

Burlap Wreath - I took the excess burlap from the curtains in the laundry room and cut 4" strips as long as the fabric piece that I had. I borrowed a wire dry cleaning hanger from a friend and shaped the wire into a circle. I poked the wire through the burlap as described here at WhereTheHeartIs. I ended up using 11 or 12 strips so that mine was as full as I liked. I also was very annoyed at how the weight of the burlap pulled it down so that there was a gap at the top of the wreath and the fabric was WAY more full and bunched at the bottom of the wreath. I solved that by cutting pieces of rubber band and using them to tie knots around the wire between the sections of burlap to keep them from slipping. This helped hold the sections where I wanted and distribute them evenly around the wreath. The rubber band is the same color as the wreath and totally invisible! I am super happy with the fix!

Red Rose Wreath - Well that's what I think it looks like anyway! I found the idea at, very appropriately, The Idea Room. I ended up making this a Dollar Tree version. I bought a white foam circle wreath form and one of their cheap baby blankets (I chose a red fleecy one with an embroidered hippo on it). I think the dimensions on the blanket were 30"x30". I took a cardboard circle template that I used for my T-shirt refashioning (it's done and fabulous, I just need a good hair day to take a pic for you... I know, I'm vain!) that was about 2.5" in diameter. I held it on the blanket and cut around it to make the circles. My version uses far less fabric than the original and doesn't entirely cover the form (found this out AFTER I started) so to make up for the fact that there were no more red blankets (I checked!) I pulled out all the "flowers" and wrapped the form in the rest of the ribbon I used for the burlap wreath to cover the white color and get a nice red base. This was helpful to cover the little gaps that I had between the red flowers. I still think it turned out beautifully! To ensure that I had as few gaps as possible when I redid the wreath I spaced them evenly around the wreath as I went instead of starting at a certain point and working my way around. I was afraid if I did that it would be hard to make sure I ended up with enough circles to fill the wreath evenly.
I really love this idea and think it would make a cute decoration in a nursery as well - they have blankets in pink, blue, yellow (I especially love that color - don't be surprised if one pops up in our nursery) and I'm pretty sure I'll do this again - but buy two blankets!
I wish you a great Love Fest this month!
Friday, February 05, 2010
More Baby Gifts!

Here is another of the cute things my sister and I crafted while she visited over the Christmas holiday. I used the tutorial you can find here. I used flannel and the soft fabric (minky? chenille?) that usually has ball indentations on it (mine has stars) for the ball. I ended up goofing up a little and flipping some of the panels so they aren't placed how I had wanted, but the babies love it! I used some largish (about ping pong ball size) jingle bells in the center for sound. Playing around with the bells, I found that the poly-fill muffles the sound a LOT. I had to take out fill, put in three bells, and smoosh the fill away from the center to allow empty air pockets so the bells could ring and you could hear them.
Wednesday, February 03, 2010
Uninspired
How's that for a title? :) I couldn't think of anything witty to write - sorry! We are currently in the midst of a perpetual cold - currently it's the babies and myself. Really, mommies should be exempt from being sick. And so should babies. Only those who are old enough to blow their noses and tell you where it hurts and drink when told and take medicine should be eligible. And primary caregivers are out altogether. And it bothers me that altogether doesn't have two "L"s in it. And it also bothers me that "till" as in "till we meet again" isn't spelled 'til. Because it's an abbreviation of "until" so I think it should have an apostrophe. And I'm thankful for spell check. I won't tell you how many red squiggly lines are underlining my words as I type. And that's how clouded my brain is - I hate being sick.
A - Finally passed off her +5 addition test (20 probs in under a minute) and will now be moving on to +6. We will be practicing at home using this site to generate worksheets. Loves to play with the boys at recess. Super gal!
M - Hopefully still gaining! She went from 50% to 4% and to 9% at her last weigh-in. We have another next week. She rolls over both ways, can sit up for a few seconds unassisted and is such a happy baby! I just love how she can make me feel such bliss when she looks at me and smiles - which thankfully she does often.
House - on hold. We were ready to pay people to fix up the last bits - but now we are thinking we should hold on to our pennies until we know more about the job situation. We have some sheets of drywall to put up, a duct to move, some closets to build and then we are ready to have some guys come in and mud/texture. Then we have a patio to pour and a yard to design. Then we are pretty much done. Oh, we need to put flooring in on the main floor. And then we are pretty much done. Except for the bathroom. And then the kitchen cupboards and counter. You get the idea...
Ok... some updates...
Rick - waiting to see if he is laid off (thanks for all your kind words on Facebook - love you!) this month. And also trying to work hard as if nothing is happening. Lots of deadlines looming... how will they do without him.
Mom - sick. See above. Still pumping after each feeding - though now from my very own pump - not a rented one. Wishing she could get a haircut, but thinking ponytails may be the order of the day until we know if we're keeping our job. Thirty bucks can buy a lot of milk and bananas!
A - Finally passed off her +5 addition test (20 probs in under a minute) and will now be moving on to +6. We will be practicing at home using this site to generate worksheets. Loves to play with the boys at recess. Super gal!
N - Had his preschool's dinosaur day at school and was in heaven. The things they learn when are interested in a subject are amazing! They made fossils and went on a "dig" and had special dinosaur treats. He is my earliest reader and picks up on things sooooo quickly! He is a quick study and I'm excited to see him grow in Kindergarten next year. (Which I registered him for a few weeks ago).
L - Firecracker. She is talking so much! I can't believe she will be two in a month. She has her opinion about everything and can get quite feisty if things aren't going as she would like. She doesn't let her siblings walk all over her - she is quick to hit when she is mad. She is also my most loving child (hugging and kissing you just because) and so quick to say sorry! She loves her siblings so much and loves to wave at them, hug them and kiss them. You can see how we are wired to learn through mimicking others when you watch her. She picks up on so much that I do and say through the day!
M - Hopefully still gaining! She went from 50% to 4% and to 9% at her last weigh-in. We have another next week. She rolls over both ways, can sit up for a few seconds unassisted and is such a happy baby! I just love how she can make me feel such bliss when she looks at me and smiles - which thankfully she does often.
House - on hold. We were ready to pay people to fix up the last bits - but now we are thinking we should hold on to our pennies until we know more about the job situation. We have some sheets of drywall to put up, a duct to move, some closets to build and then we are ready to have some guys come in and mud/texture. Then we have a patio to pour and a yard to design. Then we are pretty much done. Oh, we need to put flooring in on the main floor. And then we are pretty much done. Except for the bathroom. And then the kitchen cupboards and counter. You get the idea...
Hope you are doing well!
Friday, January 29, 2010
Keepin' it Real
I just wrote a note to friend who asked me about how I was doing with all these chitlins. She was struggling with a new baby herself and wanted to know what I had done when my hubby was out of town and how I kept it together since I was so good with organizing and schedules. Ha! Not so right now! I think that since I don't actually write in a journal that I should share the things I wrote with her.
1. This is how it is right now.
2. My kids don't know any differently.
One thing that she told me was that I have never seen a big family work so my expectations are all wrong. I have one sister - and we are almost 4 years apart so I never saw all that goes on in a house full of young kids. We had so much time with our mom, she threw birthday parties each year, we had fun outings, we had our own rooms and not many responsibilities and lots of toys and room to play. And since there was so much time between us I NEVER had to help much with my little sister. But that isn't how it goes when you have a house full of little ones.
So I don't stress that I can't go out with the girls, accept dinner invites, exercise much, clean and have yummy meals as much as I would like. I try not to worry when I voice these frustrations and people just say "Oh sure you can! You just need to 'blah, blah, blah' (insert some helpful suggestion to fix my life)". This is just the season for "getting by" at our home. And I'm OK with that. Everyone is different and has different struggles, and babies are just something that I can't juggle with a lot of other things.
And my kids don't know that they're missing out on things that I want for them - they don't think it's too terrible to be all 3 in the same room, they don't know that I want them to be able to go to the park, and have people over, and do sports and go on family hikes and whatever. They don't know that I hate that they have nowhere to play. It's just not possible right now, but they don't know what I have in my head that they aren't getting. This is normal life for them right now.
I know that things will get better as the babies get bigger. I can't wait for it! But until then I just try not to compare myself with others, or what I think life "should" be right now. Because there is only what it "is". And I am trying to make the best of that.
I feel like I am doing well. I think the biggest issue is me worrying about what other people think. That I'm lazy or not able to take care of my family like I should - that I'm slacking in my calling or not doing my best. But *I* am happy and content with how things are. I've agreed with myself to be this way just for right now. It's not how I would prefer things to be, but we're functioning and pretty happy. :) I know that as things ease up at home that I'll be able to be more clean, to do more fun things with my kids (and without them), to cook more, etc. But for me this just isn't the time and season for that. I think that what keeps me sane - knowing that my life will be back the way that I would like soon. That I will get to be the person I want to be.
I keep my posts as a record of what is happening with my family and this is a topic that has consumed my thoughts and emotions for almost 2 years. I haven't touched on it until recently on the blog, but I want to place these things down here so that I can see how far I've come (hopefully that's how I'll feel in a year or so!) and have them to share with my girls when they become moms.
I want to be honest and help my girls to not have unreal expectations in their heads that they measure themselves against. So here we go... (names have been changed - since not everyone wants to be in my blog!)
I am usually very organized, but not since Lauren. I struggle with almost everything - cooking, cleaning, spending time with each kid. This is just not the time in my life for being on top of things. And Megan is having the same weight issues Lauren had so I'm strapped to a baby or a double breast pump much of the day. It's pretty impossible to go out and go shopping, or leave the house at all for much time.
I have had baby blues after each kiddo, but with Megan I had full-on depression - which makes it harder to "see the light" and have a good attitude. I went to see a counselor once and would like to start going again in the coming months. The lady I saw was wacky and I won't see her again but I did leave with two ideas that helped me.
1. This is how it is right now.
2. My kids don't know any differently.
One thing that she told me was that I have never seen a big family work so my expectations are all wrong. I have one sister - and we are almost 4 years apart so I never saw all that goes on in a house full of young kids. We had so much time with our mom, she threw birthday parties each year, we had fun outings, we had our own rooms and not many responsibilities and lots of toys and room to play. And since there was so much time between us I NEVER had to help much with my little sister. But that isn't how it goes when you have a house full of little ones.
So I don't stress that I can't go out with the girls, accept dinner invites, exercise much, clean and have yummy meals as much as I would like. I try not to worry when I voice these frustrations and people just say "Oh sure you can! You just need to 'blah, blah, blah' (insert some helpful suggestion to fix my life)
Rick has 3 weeks vacation each year and he used almost every minute of it to stay home when we had the baby and to stay and help me in the mornings for a couple of hours. He has even made up time after the kids are in bed, working on our slow home internet connection or driving BACK to work for a few more hours. He saw that I was drowning and helped as much as he could.
And my kids don't know that they're missing out on things that I want for them - they don't think it's too terrible to be all 3 in the same room, they don't know that I want them to be able to go to the park, and have people over, and do sports and go on family hikes and whatever. They don't know that I hate that they have nowhere to play. It's just not possible right now, but they don't know what I have in my head that they aren't getting. This is normal life for them right now.
I know that things will get better as the babies get bigger. I can't wait for it! But until then I just try not to compare myself with others, or what I think life "should" be right now. Because there is only what it "is". And I am trying to make the best of that.
I feel like I am doing well. I think the biggest issue is me worrying about what other people think. That I'm lazy or not able to take care of my family like I should - that I'm slacking in my calling or not doing my best. But *I* am happy and content with how things are. I've agreed with myself to be this way just for right now. It's not how I would prefer things to be, but we're functioning and pretty happy. :) I know that as things ease up at home that I'll be able to be more clean, to do more fun things with my kids (and without them), to cook more, etc. But for me this just isn't the time and season for that. I think that what keeps me sane - knowing that my life will be back the way that I would like soon. That I will get to be the person I want to be.
You should call Sarah when your hubby is out of town. There are a lot of people who will help. And it's not bad or weak to want to have some help. I used to dread June calling me to tell me that Sarah wanted to set up dinners or some help for my family. I thought she was judging me inadequate and selfish for asking for any help. But I found out that she OFTEN has people over to watch her kids so she can go to the temple, or shopping, and she has people even watch them overnight so she can be with her husband. Many people have family who could do that, but I don't and I was amazed at all the help she was getting. It kind of made it OK for me to ask for help too.
When Rick was in Alabama and I was sick with the flu I just about lost it. Both babies were up all night - tag-teaming it seemed - and at one point I thought how I wished that I could just drop my kids off at the fire station so that someone could take care of them better than I was - and for that one second I was dead serious. I called Rick the next day and had him call Sarah because I knew I couldn't do another night like that.
She had a hard time finding people to come over b/c I had what I am pretty sure was the swine flu and no one wanted to get sick. So she had my Home Teachers come by and give me a blessing and she herself came over to help me get the kids into bed while Betty cleaned my bathroom and Alice made them dinner. Connie came over one morning and Ruth the next. It was amazing. An extra pair of hands is such a God-send sometimes. So I strongly encourage you to have people come by. Have dinners brought in, have someone come by in the evening/morning whenever you feel like you need an extra adult to wrangle the kids. It really isn't a big deal to them - not an inconvenience. They enjoy spending time with you and your kids and it's like a huge weight is lifted off of you. Really, it's not a burden and the difference can be life-changing for you.
I think in the past that's how women got things done - no one lived far from family and everyone helped each other. We are more isolated now and I think so many suffer because of it. I was talking with Wanda and she said she's seen women of our grandparents' generation talk of how hard it was and feel very bitter about their lives. So many were depressed. We really do need each other. It is so hard to be a good mom - especially when you have high expectations for yourself.
This may be WAY more than you wanted or expected - sorry if you didn't need all that! :) You have been through so much lately, and it is soooo hard to be a good mom. You could do it by yourself, but you shouldn't. It will be ok! Tell me how I can help! :)
And... that was it. It's such a journey to be OK with my "sub-par" life currently. Really, if I didn't know that this was not how my life would be forever I think I would lose it. It's just for a short time - I can do it. It's exactly what I tell myself in labor. And truly it's not like this for everyone. That's why so many people just tell me to "Just Do It". "Sure you can exercise." "Just start a schedule." But they aren't me and they don't have my limitations or my skill set, physically or emotionally. They have no idea what it is to be Erika in this part of my life right now. I hope my girls never have to go through this, but if they do I hope that I can show them that THEY CAN. Megan, Lauren, Nathan, Ashlyn - I love you!
"Love One Another"

Here is one of the very first crafts I ever attempted! I found the inspiration and directions here and crafted away! I added a clear top coat to protect it (and my furniture!) from paint transfer and minimize dings to the finish.
This is still my favorite decoration for Valentine's Day and I keep it up as long as I can because I love the sentiment!
Tuesday, January 26, 2010
For Shelley
So here is the concoction that makes the lovely Thieves Oil...
1 Tbs Clove Oil
I keep this in a dark glass bottle with an eyedropper lid that I purchased for less than $2 at the Vitamin Cottage (where I also bought the oils and some Dr. Bonner natural liquid soap). Don't keep this in a clear container or the oils will lose effectiveness.
This recipe was originally written to be mixed with 1 cup Jojoba oil or another carrier oil (olive, almond, etc) and used topically (dabbed on your skin) to keep you from getting sick. I chose to keep a mixture of just the Essential Oils to use in my cleaning products. If I choose to use it topically I'll dilute as I use it - 1 drop Thieves to 4 drops of a carrier oil.
If you dilute the Essential Oils with a carrier oil you can dab it on your chest, feet, wherever so they are absorbed into your skin. NEVER put the undiluted oils on your skin - they are too concentrated.
You can also put a drop or two of the oils (or 2-3 drops of the oils mixed with Jojoba) in a pot of simmering water on the stove to sanitize the air.
1 Tbs Clove Oil
1 Tbs Lemon Oil
2 1/2 tsp Cinnamon Oil
2 tsp Rosemary Oil
2 tsp Eucalyptus Oil
I keep this in a dark glass bottle with an eyedropper lid that I purchased for less than $2 at the Vitamin Cottage (where I also bought the oils and some Dr. Bonner natural liquid soap). Don't keep this in a clear container or the oils will lose effectiveness.
This recipe was originally written to be mixed with 1 cup Jojoba oil or another carrier oil (olive, almond, etc) and used topically (dabbed on your skin) to keep you from getting sick. I chose to keep a mixture of just the Essential Oils to use in my cleaning products. If I choose to use it topically I'll dilute as I use it - 1 drop Thieves to 4 drops of a carrier oil.
If you dilute the Essential Oils with a carrier oil you can dab it on your chest, feet, wherever so they are absorbed into your skin. NEVER put the undiluted oils on your skin - they are too concentrated.
You can also put a drop or two of the oils (or 2-3 drops of the oils mixed with Jojoba) in a pot of simmering water on the stove to sanitize the air.

Monday, January 25, 2010
And for my next trick...
...fixing a T shirt with random blue stains! Where do these things come from? I'll update when I finish. Here is my inspiration! I'm chopping up a sacrifice Tee to cover the stains on mine. Is it bad that I'm sacrificing my daughter's Tee for the greater good? Hope for the best!
In other news... Megan is doing better with her weight now - up to 13lb 13.2oz as of yesterday (9%). She seems a little out of sorts and fussy but they weren't able to find anything the matter so pray she starts to perk up so Mommy and Daddy don't lose it! ;)
And we are having some changes at TheOnesInColorado - hopefully changes for the best! I'll tell you when I can - so no begging! :) We are having a time of reflection and prayer and waiting on some divine guidance...
Also - this weekend we started "decrapifying" downstairs (thanks for all your cute comments on Facebook about it!) but only got so far before Sick Mommy had to retire for the day. I'm glad that I was sickest on the weekend though - not much is harder than being a sick mom alone during the week. I am grateful we were able to have 2 adults to share the burden and hoping I'll be doing better as Monday looms closer!
Sunday, January 24, 2010
The best baby gifts!
Let me introduce you to my favorite baby gifts!


And finally for the diaper case - I use the pattern and tutorial here. I have a special place in my heart for diaper cases - I just hate how dipes always get smashed up and yucky in the bottom of the diaper bag! And I should add that I make my diaper cases bigger than her pattern yields so I can have more diapers in there!

And be grateful that you are using the updated pattern! The first one I made was all wonky and the second one (Thank Heaven!) my mother-in-law was here for and helped me figure out how to fix. For my third they fixed the pattern and I had no problem whatsoever! :)
The set includes a Burpie, Bummie, and a Diaper Case - and you can make all of them with just a yard of cutesy fabric and some terry cloth!

The Burpies are nice-sized burp cloths and the Bummie is a changing pad. I found them here. Very easy! Just cut out a 10"x18" rectangle of fabric and the same size rectangle of terry for each Burpie you want. Place them right sides together and sew the perimeter - making sure to leave a gap to turn the Burpie right-side out. Tuck in the seams of your gap so they match the sewed sections and then top stitch all the way around.

Here's a tip: Did you know you can have different colored thread in your bobbin than what you're using to sew with for your top thread on the machine? This way you can disguise your stitches! For example, you can see above that the thread is brown on the side of the Burpie that has the patterned fabric, but I used white thread in my bobbin so you can't see the stitches on the terry side! Nifty, eh? Of course I didn't think of that on my own - but I use it all the time now! I found out about it here (also where I was introduced to the hem guage - where you'll find another great burp cloth tutorial! I used it to make this set...

OK, back to the Bummies...
Same idea for the Bummie as for the Burpie - but the size is 16"x22" and you sew a piece of ribbon into one of the short sides so you can tie it up. To do this I fold the ribbon in half, place the folded end of the ribbon in between your 2 fabrics 1/4 of the way down a short side. This way when you fold the Bummie in half the long way and then roll it up, the ribbon tie will end up being in the center of your roll.
And finally for the diaper case - I use the pattern and tutorial here. I have a special place in my heart for diaper cases - I just hate how dipes always get smashed up and yucky in the bottom of the diaper bag! And I should add that I make my diaper cases bigger than her pattern yields so I can have more diapers in there!

And be grateful that you are using the updated pattern! The first one I made was all wonky and the second one (Thank Heaven!) my mother-in-law was here for and helped me figure out how to fix. For my third they fixed the pattern and I had no problem whatsoever! :)
So there you are! I will be adding more links to baby gift tutorials soon!
Lest you think I have turned into a craft blog...
I think since I'm not getting graded here I can plagerize...
Read it before you go on!
This pretty much sums it up! :) Kathryn has such a way with words - I feel so lost for words most of the time that I can't express how I feel in a way that comes across in a way that is a true reflection of what I want to say.
And how silly of me that I never thought to stop and send a prayer "heavenward asking for wisdom for a mother of four". As much as I know it intellectually it is never my first thought - "Oh, I should be praying for help with this." My prayers lately (though not this week - I've been working on it!) are often in desperation, at a time of perceived crisis. Silly me, why not pray before? Each day? For fortitude and wisdom? Maybe I need to have friends to take long walks with - and take them! Or a husband who talks! ;)
I love how Kathryn puts it and hope that I can reach the same peace she seems to have.
Saturday, January 23, 2010
The craft half of the laundry room in all it's glory!

Friday, January 22, 2010
Tired of the Dollar Tree?
Too bad - cuz I'm not quite finished yet!

Anyhoo....
I pictured it covered with burlap - not quite to the top or to the bottom, just a strip around the middle with tin showing above and below. Then I had thought to add some cute black ribbon around all the way around in the middle of the burlap.
But the tin had other plans! You shall see!

I needed a larger container to hold my scrapbooking scissors (and the normal ones too) so off to the store I went! I first found a tin at Target for $2.50 in the Dollar Spot that I loved but I felt like it was smidge too big and I had been hoping for something for a dollar. Hmmm. I'm so glad I listened to my gut and decided against it because look what I found at the Dollar Tree!

Same idea, perfect size! And I need to ask - why not leave a good thing alone? Why did they add the ridiculously silly pictures on the side? Oh, well - they are just testing my imagination to see if I can find the potential! This is supposed to be a planter and you should be able to find one for yourself when your store gets it's spring supplies in. One of the stores near me had it and one did not so I think they are just coming out.
Anyhoo....
I pictured it covered with burlap - not quite to the top or to the bottom, just a strip around the middle with tin showing above and below. Then I had thought to add some cute black ribbon around all the way around in the middle of the burlap.
But the tin had other plans! You shall see!

First I cut a strip of burlap wider than the planter's height and longer than it's circumference and hot glued it to the planter.


This one was a quickie and there is much room for embellishment or you can keep it simple! I may add to mine - maybe a label or burlap/scrapbook flower. I'm not sure yet, but I love it for now!

Then I trimmed it. And I ended up trimming too much! The silly blue butterfly wing went up higher than I thought and the tip of blue showed. :( So I ended up just taking some plain black ribbon and gluing it around the top to hide my mistake. It actually looked very cute with just the burlap trimmed flush with the edges on the top and bottom. But I like this better so I'm glad for a providential scissor mishap!

This one was a quickie and there is much room for embellishment or you can keep it simple! I may add to mine - maybe a label or burlap/scrapbook flower. I'm not sure yet, but I love it for now!
Thursday, January 21, 2010
Other recipes I plan on trying
Again from the Earth Day on the Net Site:
Toilet Bowl Cleaner
Looking for ecological and effective method to clean your toilet? Look no further. Plus you get a super fun science experiment that young children will adore -- which is great news if you're looking for ways to get them involved in the household cleaning.
1/2cup baking soda
1/2 cup white vinegar
Pour baking soda into your toilet bowl and mix thoroughly with a toilet brush. Scrub inside the rim as well. Allow the baking soda to sit for up to 20 minutes -- the longer it sits, the more stains and odors it removes. Pour in white vinegar and stand back as your toilet foams up like a mini-volcano.
I also think I'll be adding Thieves Oil to the Mold Remover - do you really think I have to rinse it off? I wonder why it would matter since it's dry by the time the recipe says to rinse.
For really dirty floors, dissolve 1/4 cup of Borax in a cup of warm water and add to the vinegar mix.
For ceramic and stone tile floor, use the above formula, but rinse well with clear water.
For wood floors, mix one part olive oil with one part white vinegar in a spray bottle. Shake well and mist over your floor. Shine with slightly damp cloth.
Looking for ecological and effective method to clean your toilet? Look no further. Plus you get a super fun science experiment that young children will adore -- which is great news if you're looking for ways to get them involved in the household cleaning.
1/2cup baking soda
1/2 cup white vinegar
Pour baking soda into your toilet bowl and mix thoroughly with a toilet brush. Scrub inside the rim as well. Allow the baking soda to sit for up to 20 minutes -- the longer it sits, the more stains and odors it removes. Pour in white vinegar and stand back as your toilet foams up like a mini-volcano.
When foaming action stops, scrub thoroughly with toilet brush. Clean outer surfaces and toilet seat with All Purpose Cleaner.
Flush to remove any residue.
Bathroom Mold Remover
The mold that builds up in your bathroom tile grout can quickly become a serious health concern. But you don't need to use the toxic guns to remediate it.
Start first with prevention: Maximum ventilation in the bathroom is key.
If there are no windows to crack or if the mold has already multiplied, then using this all-natural recipe will cure the problem in a jiff:
4 tablespoons 3% hydrogen peroxide
8 tablespoons warm distilled water
Mix peroxide and water together in a small spray bottle. Spray affected areas and wait at least one hour before rinsing.
I also think I'll be adding Thieves Oil to the Mold Remover - do you really think I have to rinse it off? I wonder why it would matter since it's dry by the time the recipe says to rinse.
Floor Cleaner
Most floors can be easily cleaned with one cup of white vinegar mixed into a gallon of water.
Don't worry: Your house won't smell like a salad bar as the vinegar smell dissipates in seconds. You can always add a few drops of Essential Oil, though, if you prefer a fresh mint, citrus or lavender scent.
Again - I'll be adding Thieves oil - or maybe just Lemon - mmm!
For really dirty floors, dissolve 1/4 cup of Borax in a cup of warm water and add to the vinegar mix.
For ceramic and stone tile floor, use the above formula, but rinse well with clear water.
For wood floors, mix one part olive oil with one part white vinegar in a spray bottle. Shake well and mist over your floor. Shine with slightly damp cloth.
Oven Cleaner
from Recipezaar.com
An environmentally friendly, easy, non-chemical way to clean your oven. No over-powering fumes.
1 cup baking soda (or more)
water
2 tablespoons dish detergent
Wednesday, January 20, 2010
The curtains are done!

These are (again) in the craft/laundry room in our basement. I just love them. And the tan fabric is burlap! You can either glue these together or sew them. I chose to sew - and surprisingly the burlap worked well! I was worried since the weave was so loose, but I didn't have any problems (well, not any problems that didn't involve a brain malfunction on my part - it's a rare project that I don't end up using the seam ripper!). I found my inspiration here and still plan on doing something similar in my living room. I haven't had window treatments in that room in the 6 years we've lived here. I was just waiting for something to strike me and now it has! Yay!
Tuesday, January 19, 2010
Made it!

Thieves Oil All-Purpose Cleaner. Mmmm - the kids loved the smell and I loved the clean! I found a recipe online and went to town in the kitchen last night - counters, microwave, cupboards, stove knobs, window sills - the works! I have to say that it did at least as well as 409 has for me - likely better. I think it is safe to say that I will be gifting some of my cleaning supplies and making my own.
If you are interested here is the recipe from Earth Day on the Net:
This is a great All Purpose Cleaner for everything from kitchen countertops to bathroom tubs to unidentifiable carpet stains. Gentle enough for young children to use on their own, yet tough enough to remove stubborn stovetop grease.
Note: While this recipe is 100% natural, Borax can cause eye irritation and, if consumed in large quantities, can be poisonous to humans and animals. Exercise caution when handling Borax and store it safely away from children and pets.
1 teaspoon Borax
1/2 teaspoon washing soda
2 teaspoons white vinegar
1/4 teaspoon dishwashing liquid
2 cups hot water
Optional: 15-20 drops of Essential Oil (EO) of your choice
Mix vinegar, Borax, washing soda and 1 cup of hot water in a 16-ounce spray bottle. Swish around gently until the Borax and washing soda has fully dissolved.
Add remaining hot water, dishwashing liquid and optional essential oil. If you can't find washing soda in the laundry section of your grocery store, substitute with 1 full teaspoon of regular baking soda.
From Erika: I added the Thieves Oil I made as the EO and used Dr. Bonner's soap for the dishwashing liquid. And make sure you are using washing soda and not baking soda. Ask around at your grocery store - sometimes they keep things that aren't purchased often in a back room.
Monday, January 18, 2010
Dollar Store Cork Board

So cute and lovely, no? The original Dollar Tree cork board was nice - it just had a medium oak color frame.
First thing I did was to spray paint. On this frame, unlike most I've painted, the back didn't easily come off. So to keep from painting the cork I slipped pages in between the frame and the cork all around the frame. Here's one piece of paper to show what I mean...

The cork on this board is super thin (what do you expect for a buck!) so I am thinking about buying a roll of cork board and cutting out a rectangle of it to glue to the back side of this frame. But that's for another day!
Now on to the pushpins!


I bought a pack of pushpins (again at the dollar store) and pulled off the pin. It's the dark portion in the pics below. It was held on with a dab of glue and was SUPER easy to remove.

I could have hot glued some fabric around the existing cover (pink in the pictures) but I didn't want to have a sticky mess so I bought a pack of 4 button covers at WalMart - I think they cost $1.22.


I took the back of the button and pounded down the sewable metal loop so I could stick the pin on.

Cut a piece of your desired fabric and place it in the rubbery portion of the button maker.
The directions say to cut the fabric at least 2x the diameter of the button. Don't be afraid to cut it too big - you can trim it later! (And it will look very silly and require some craftiness to salvage your button if you trim too much now - ask me how I know!)
Then place the button cover on top of the fabric.
Then place the button cover on top of the fabric.

Use the pusher and push the cover down into the hole.
Tuck in the fabric (here is where you can trim a little bit of the fabric if you like - but not too much!) and place the button back on the top.


Next use the pusher and push the button together.

And out it comes!

Place glue on the button and the tack on the glue.


Subscribe to:
Posts (Atom)
