Showing posts with label Dollar Store. Show all posts

Saturday, March 20, 2010

Weekend of Crafts on the Cheap

First - just take yourself over here. Kristine McKay Designs is such a fantastic place to get fun ideas for crafts and decor. I have to say it's one of my favorites. Here are some of the reasons I love her: (dearly not queerly as Kim would say!)

1. She has great taste. I find many sites where I like something they've shared but the majority of the crafts are just not my style. Not so with Kristine! I love it all!

2. She shares. She has created these lovely things and then she explains them! And shares files so you can copy her exactly! It is so irksome to see a "craft blog" with just pics and no explanations of how they did it. I'm not a creative gal, just a copycat so I appreciate directions! And really, her downloads so you can have the same graphics she used are such a bonus!

3. She does things that are easy and reasonable in cost. This is very important to me as I just can't spend lots of money without getting hives - or the heebies at least. :)

I have to say there is a bad side to all this craftiness... I now want a Silhouette cutter. Badly. I need vinyl.

So here is a wreath for next year based on Kristine's Easter wreath made with supplies from the Dollar Tree. Check out her post at the site linked above. My wreath definitely needs a little something to perk it up. I have no idea what that something may be. Ideas?

And here is the Easter wreath. Disregard the bow. Please. I'm bowtying-deficient. I'm trying!
The wreaths at JoAnne's (speckled eggs on Spanish moss) were $30 a piece. I kid you not. I cheated and didn't spray paint the Dollar Tree eggs like Kristine did, I just bought a package from JoAnne's (on a tip from Kristine) for $3. And comparing the 2 wreaths I'm thinking I may rearrange my eggs. But I did it while watching Twilight. I was distracted. ;)

And here we have my next attempt at crafting. I'm hoping that this...

plus this...

will equal this.
This is from this site. The plaque she bought (Happiness...) is from the Dollar Tree as well. She painted everything and then antiqued it. I have a plaque as well that I did this to - just has a different saying.
Aren't these hideous? Why would you put yellow stripes down the sides? Silly people.

Saturday, February 20, 2010

Getting ready for spring!

I have toyed around with growing herbs indoors for so many years but have never actually done it. Well - this is the year!
I saw something similar to these clay pots and loved the idea! You use chalkboard paint (did you know you can make your OWN???!!!) and a pot and you are set!
I found a kit at the Dollar Tree that comes with Basil, Dill, Chives, and Parsley seeds as well as a tray and lid to germinate the seeds. And though it doesn't come with soil, you can get that at the Dollar Tree as well!

The package comes with all four seeds mixed together so, of course, I separated them! If you know me, you know it would drive me bonkers to not know what each seedling was and to have them all growing together. It wasn't too bad!

Here's some help for you...
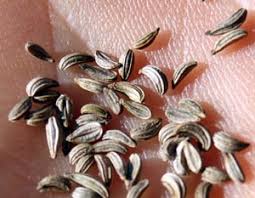
Below are the dill seeds. They have this flat little halo around them so they are easy to distinguish.

And below are the parsley seeds. They look similar to the dill, but are a little more of a crescent shape and don't have that halo.

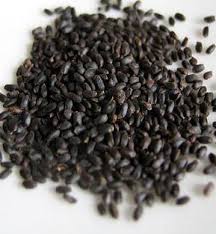
These next two are the toughest to distinguish - they are both tiny and black!

Below is the Sweet Basil. It is smoother and less angular - like an oval. It's also less deep of a black color.

And the last seed is the Chive. These are an obsidian color and more of a crescent/angular seed.

I plan to divide the herb box into quadrants and then move the seedling later to my pots. So exciting!

Saturday, February 06, 2010

So Purdy!

Awww - can you feel the love? February is a Love Fest over here in Colorado! We spread the Valentine holiday out and treat each other to fun month of celebrating the love we have as a family. We have special dinners and leave each other notes and gifts all month long in the little mailboxes that sit on our mantel. I love February.

Last night I finished the last few items on my Valentine decorating list while watching the Swiss Family Robinson. And because I share it all - let me tell you something kinda funny. A ways into the movie I felt super smart and had to share my intellectual genius with my hubby! I had noticed the characters mentioning some cities back home - Bern and Interlaken to be exact and had a lightbulb moment! I said to my husband, "Hey Rick! I think the family is from Switzerland!" While waiting for him to compliment me on my knowledge of geography (I didn't even have to google it!) he grinned and paused a moment. Looking at his face and suddenly hearing my thought spoken out loud I realized what a true GENIUS I am. Gee - Erika, how did you figure that out? Could it be perhaps from the movie's TITLE???

Oh well, I am breathing a sigh of relief and I am really happy with how it all came out! These were very inexpensive and as usual the Dollar Tree figured prominently!
Here is the how to...


Framed XOXO - buy some frames at the Dollar Tree or use ones you already have. Mine are all 5x7 size. Paint if desired (I use the $1 black spray paint from Wal-Mart - 2 coats). Cut out a piece of decorative paper and slip in front of the glass. Play with the glass pebbles found in the floral department (again the Dollar Tree - I bought two packages, but used less than one for these four frames) until you find a design you like. Then glue them on - I used E6000. I just lifted up one pebble at a time and glued so I didn't disturb my design. I found the original idea at tatertotsandjello. I'm thinking her frames were bigger or her pebbles smaller - but either way they are lovely!

I'm anxiously waiting for her post on Monday about her Dollar Tree tiered serving platter! I've been wanting one and I'm thrilled to make one myself on the cheap and tailored to my taste!

Burlap Wreath - I took the excess burlap from the curtains in the laundry room and cut 4" strips as long as the fabric piece that I had. I borrowed a wire dry cleaning hanger from a friend and shaped the wire into a circle. I poked the wire through the burlap as described here at WhereTheHeartIs. I ended up using 11 or 12 strips so that mine was as full as I liked. I also was very annoyed at how the weight of the burlap pulled it down so that there was a gap at the top of the wreath and the fabric was WAY more full and bunched at the bottom of the wreath. I solved that by cutting pieces of rubber band and using them to tie knots around the wire between the sections of burlap to keep them from slipping. This helped hold the sections where I wanted and distribute them evenly around the wreath. The rubber band is the same color as the wreath and totally invisible! I am super happy with the fix!

Red Rose Wreath - Well that's what I think it looks like anyway! I found the idea at, very appropriately, The Idea Room. I ended up making this a Dollar Tree version. I bought a white foam circle wreath form and one of their cheap baby blankets (I chose a red fleecy one with an embroidered hippo on it). I think the dimensions on the blanket were 30"x30". I took a cardboard circle template that I used for my T-shirt refashioning (it's done and fabulous, I just need a good hair day to take a pic for you... I know, I'm vain!) that was about 2.5" in diameter. I held it on the blanket and cut around it to make the circles. My version uses far less fabric than the original and doesn't entirely cover the form (found this out AFTER I started) so to make up for the fact that there were no more red blankets (I checked!) I pulled out all the "flowers" and wrapped the form in the rest of the ribbon I used for the burlap wreath to cover the white color and get a nice red base. This was helpful to cover the little gaps that I had between the red flowers. I still think it turned out beautifully! To ensure that I had as few gaps as possible when I redid the wreath I spaced them evenly around the wreath as I went instead of starting at a certain point and working my way around. I was afraid if I did that it would be hard to make sure I ended up with enough circles to fill the wreath evenly.

I really love this idea and think it would make a cute decoration in a nursery as well - they have blankets in pink, blue, yellow (I especially love that color - don't be surprised if one pops up in our nursery) and I'm pretty sure I'll do this again - but buy two blankets!

I wish you a great Love Fest this month!

Saturday, January 23, 2010

The craft half of the laundry room in all it's glory!


Here's another room almost all the way done - the basement is coming together! Yay us!

Friday, January 22, 2010

Tired of the Dollar Tree?

Too bad - cuz I'm not quite finished yet!

I needed a larger container to hold my scrapbooking scissors (and the normal ones too) so off to the store I went! I first found a tin at Target for $2.50 in the Dollar Spot that I loved but I felt like it was smidge too big and I had been hoping for something for a dollar. Hmmm. I'm so glad I listened to my gut and decided against it because look what I found at the Dollar Tree!
Same idea, perfect size! And I need to ask - why not leave a good thing alone? Why did they add the ridiculously silly pictures on the side? Oh, well - they are just testing my imagination to see if I can find the potential! This is supposed to be a planter and you should be able to find one for yourself when your store gets it's spring supplies in. One of the stores near me had it and one did not so I think they are just coming out.

Anyhoo....

I pictured it covered with burlap - not quite to the top or to the bottom, just a strip around the middle with tin showing above and below. Then I had thought to add some cute black ribbon around all the way around in the middle of the burlap.

But the tin had other plans! You shall see!
First I cut a strip of burlap wider than the planter's height and longer than it's circumference and hot glued it to the planter.
Then I trimmed it. And I ended up trimming too much! The silly blue butterfly wing went up higher than I thought and the tip of blue showed. :( So I ended up just taking some plain black ribbon and gluing it around the top to hide my mistake. It actually looked very cute with just the burlap trimmed flush with the edges on the top and bottom. But I like this better so I'm glad for a providential scissor mishap!

This one was a quickie and there is much room for embellishment or you can keep it simple! I may add to mine - maybe a label or burlap/scrapbook flower. I'm not sure yet, but I love it for now!

Monday, January 18, 2010

Dollar Store Cork Board


So cute and lovely, no? The original Dollar Tree cork board was nice - it just had a medium oak color frame.

First thing I did was to spray paint. On this frame, unlike most I've painted, the back didn't easily come off. So to keep from painting the cork I slipped pages in between the frame and the cork all around the frame. Here's one piece of paper to show what I mean...
The cork on this board is super thin (what do you expect for a buck!) so I am thinking about buying a roll of cork board and cutting out a rectangle of it to glue to the back side of this frame. But that's for another day!
Now on to the pushpins!
I bought a pack of pushpins (again at the dollar store) and pulled off the pin. It's the dark portion in the pics below. It was held on with a dab of glue and was SUPER easy to remove.

I could have hot glued some fabric around the existing cover (pink in the pictures) but I didn't want to have a sticky mess so I bought a pack of 4 button covers at WalMart - I think they cost $1.22.
I took the back of the button and pounded down the sewable metal loop so I could stick the pin on.
Cut a piece of your desired fabric and place it in the rubbery portion of the button maker.
The directions say to cut the fabric at least 2x the diameter of the button. Don't be afraid to cut it too big - you can trim it later! (And it will look very silly and require some craftiness to salvage your button if you trim too much now - ask me how I know!)

 Then place the button cover on top of the fabric.

Use the pusher and push the cover down into the hole.
Tuck in the fabric (here is where you can trim a little bit of the fabric if you like - but not too much!) and place the button back on the top.
Next use the pusher and push the button together.
And out it comes!
Place glue on the button and the tack on the glue.
  
And you're done!

Sunday, January 17, 2010

Ribbons and the Dollar Tree

First - ribbon storage! I loved these ideas from kmckaydesigns.com. I bought the Crop-a-dile specifically to make the box with the cute acrylic jars. I followed the instructions here. Basically you punch holes in the acrylic and set extra-large eyelets in the holes.

This cute project turned out to be super cute but much more of a pain than I anticipated. First the Crop-a-dile... I found it to be cheapest online at HSN for the punch and hundreds of eyelets and accessories. I was impatient to be started and didn't think I'd use all the extras so I opted to use my 40% off coupon at Hobby Lobby and get just the punch w/o the extras for $30. (It was $36 with shipping at HSN). Little did I know that I would have to wait anyway!
The eyelets pictured are the only ones I saw that were large enough for the ribbon and to go through the acrylic. And they are nowhere in my local stores. So I ended up ordering them online from craftybetty.com. So after all of this I was finally able to get started with my loverly box. I think it turned out well, but the "hairline" cracks in the acrylic mentioned in the directions were huge! Maybe kmckay used a thinner acrylic. But with the ribbon inside you really can't tell.

I chose to Mod Podge some scrapbook paper, trimmed to fit, on the sides of my box. I painted the edges black and then painted on MP with a sponge brush, smoothed out my paper with a plastic pan scraper (pack of 2 for a buck - and they work great on my dishes) and then applied another coat of MP. I think it looks great, and matches the patterns and colors in my craft area. And I used the method discussed on the tute video to paint and dry my knobs for the boxes - such a good idea!

And the post-it note holder - another dollar store creation. You buy the 5x7 acrylic frame, slip a piece of scrapbook paper in where the photo goes, decorate, and stick the post-its on. I didn't glue - just let the post-it pad's sticky strip hold it up. The pen is made to match by rolling a strip of the paper up and pushing it into the ink compartment of a clear pen. Very cute if I do say so myself. I now look forward to jotting down phone messages!
I also made another ribbon storage box with the Crop-a-dile and eyelets. I took a photo box (mine was from JoAnn's but Hobby Lobby also has them - $3.99, use your 40% off coupons) and punched eyelets around the sides. This time no cracking! :)

Here are some other fun things for the craft room from the dollar store:

2 cheap canvas pictures and a brassy plastic mirror... sorry no befores of the mirror. I promise it was less than beautiful.


Then spray paint the mirror frame and paint the edges of the pictures.

Mod Podge on some pictures or paper to match your decor.
These are on the wall between my cupboards in the laundry/craft room.

Thursday, January 22, 2009

On to brighter things...


Lauren is actually now wearing outfits that I remember Ashlyn wearing (except Ashlyn walked in them and Lauren scoots in them.)


Nathan is showing you the wall where we will soon have coat/backpack hooks! Yay! We have some in the kids' room but it is much easier with school in session to have something right by the door. And, they seem to fill the pegs in their bedroom very quickly with many, many hang-able things. The things on the wall are Post-It flags to mark the studs so we know where we're headed!


The hook dealy isn't put together yet, I just painted and sealed it last night, but it's being assembled (hopefully) today! The hooks were just $2.50 in the Dollar Spot at Target - the board is just a 1"x4" from Home Depot cut to 24". Rick was going to run it through the router but I think plain looks lovely so that is what we're doing. Oh, and after finally finding out how boards can look so beautiful and rough around the edge - please add belt sander to my covet list.

Sunday, November 16, 2008

State Quarters

I know this is random - but that's what my Random Erikaness category is for right?

Rick has the "United States of America Coin Collector's Map" - we found in the dollar spot at Target. It has a spot for all the state quarters that have been released. He is now missing just 5 and I would love to give these to him as a present. He's so hard to shop for - he really doesn't want anything I can afford (new house, large guns, cars/motorcycles, pool table, lifetime supply of Mountain Dew/Alpine Cider/Martinelli's/NesQuick etc.) but I know he would love to finish up his map.

So I'm sending a plea for help - Any chance you have a Delaware, Florida, Tennessee, Louisiana or Hawaii sittin' in your coin purse with nothin' to do?
Related Posts with Thumbnails